The Project
A section designed as a part of one of the Module for 1st year students. The subject matter was used from a book. This project has to introduce student the basics of lighting in photography, make them to practice and then assess their understanding. The project had to be interactive and easy to understand.
Target Audience
- 1st Year Students
- Around 18-20 years old
Responsibilities
- Instructional Design
- eLearning Development
- Graphic Design
Tools Used
- Articulate Storyline 3
- Adobe Photoshop
- Adobe Illustrator
- WireframeSketcher
The Purpose
This section was designed as one of the parts of Lighting Module in their 1st Year of the course. The intention of this section is to make the student observe light and shadow, and to make them understand some strategies for describing the three-dimensional aspect of how an image is lit.
The Flowchart
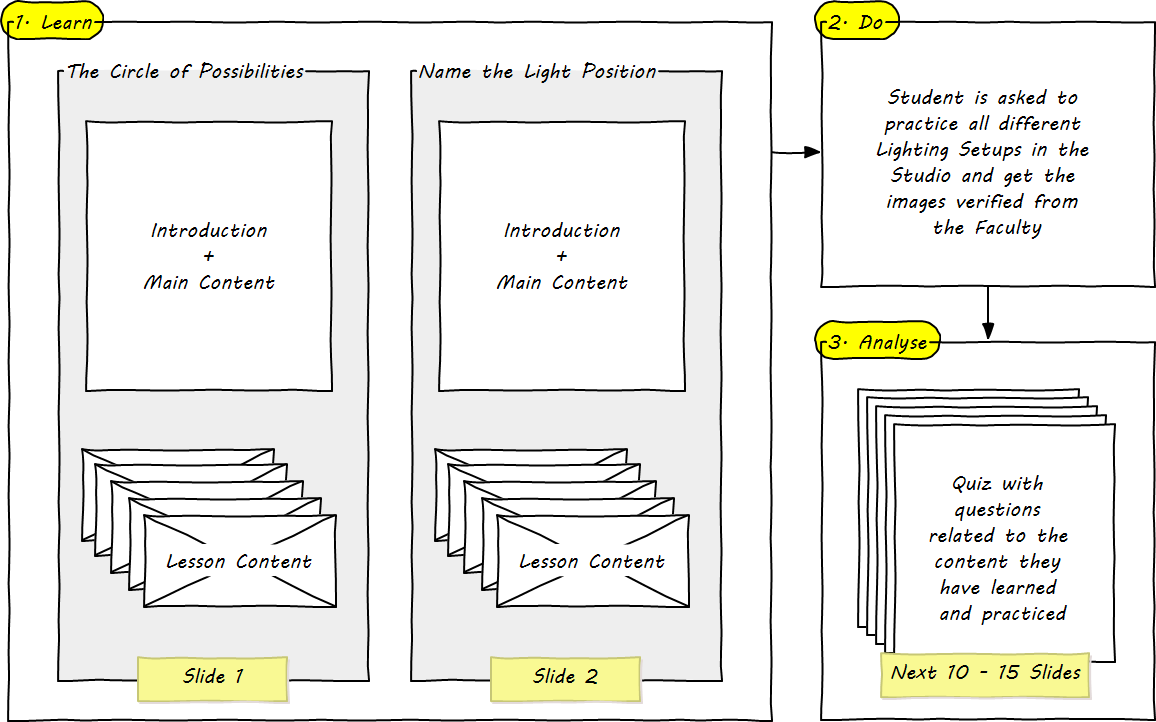
The design needed to fulfill 3 main goals,
-
- Learn
-
- Easy to Understand – Student goes through an engaging interactive content.
- No time Limit – Student takes its own time to learn and understand the content.
-
- Do
-
- Activity – Student demonstrates his/her understanding.
-
- Analyse
-
- Quiz – Student solves problems by applying acquired knowledge.
-
- Learn
The User Experience Design
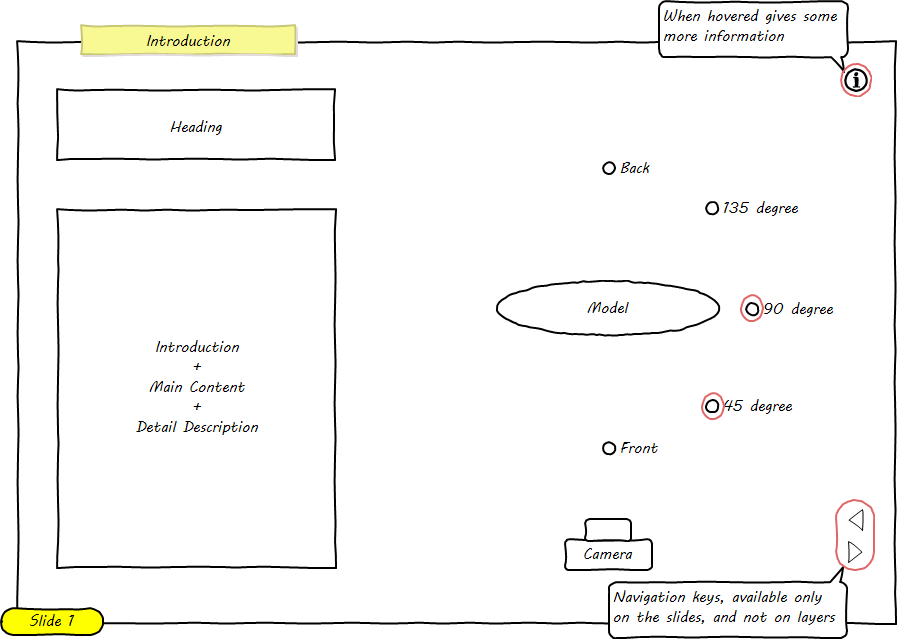
I had used the book “ABC’s of Beautiful Light” by Rosanne Olsonas, as a subject matter for this project. The design of this project was also inspired from this book. I had used 2 two slides and few layers in every slide to complete the learning content. Let’s see “Slide 1” user experience wireframe.
The image above shows the wireframing for “Slide 1” user experience design. Now let’s go through the details of different layers which are part that design.
01. Slide 1 – Main Page
This is the opening slide. Student reads through the content displayed in the “Body”. For more information they can hover the mouse over the “i” symbol on the top right corner. Student is asked to click on either “90 degree radio button” or “45 degree radio button” for further learning content.
02. Slide 1 – Layer 1
This layer opens when student clicks “90 degree radio button” on the Slide 1. The layer displays a lighting diagram. The effect it has on the model is also displayed in the image on the left side with a description for it.
If “Model” is clicked we jump to “Slide 1 – Layer 2”.
If “X” (displayed on every layer) is clicked, we close the current layer, so that Slide 1 is displayed.
03. Slide 1 – Layer 2
This layer opens when student clicks “Model” on “Slide 1 – Layer 1”. The layer displays one more lighting diagram. The effect it has on the model is also displayed in the image on the left side with a description for it.
If ”Model” is clicked we jump back to “Slide 1 – Layer 1”.
If “135 degree radio button” is clicked, we jump to “Slide 1 – Layer 3”.
04. Slide 1 – Layer 3
This layer opens when student clicks “135 degree radio button” on the “Slide 1 – Layer 2. The layer displays one more lighting diagram. The effect it has on the model is also displayed in the image on the left side with a description for it.
If “90 degree radio button” is clicked, we jump to “Slide 1 – Layer 1.
05. Slide 1 – Layer 4
This layer opens when student clicks “45 degree radio button” on the Slide 1. The layer displays one more lighting diagram. The effect it has on the model is also displayed in the image on the left side with a description for it.
If “Model” is clicked, we jump to “Slide 1 – Layer 5”.
06. Slide 1 – Layer 5
This layer opens when student clicks “Model” on the “Slide 1 – Layer 4”. The layer displays one more lighting diagram. The effect it has on the model is also displayed in the image on the left side with a description for it.
If “Model” is clicked, we jump back to “Slide 1 – Layer 4”.
Slide 1 had the Main Slide + 5 more Layers. Once student has gone through Slide 1 content, they can navigate to Slide 2 using the navigation keys (which get activated after 6 sec from the start of Slide 1). Same is the flow for Slide 2, which is shown below. It has the similar user experience as in Slide 1. The wireframe below is self explanatory.
After Slide 2 is complete,
-
- Student is asked to check their mail for the practice work assigned to them.
- During the practice work, student gets constant feedback from faculty.
- Student has to show their practice work then and there to the faculty and get it approved.
- If all the practice work images are approved by the faculty, they are asked to take the Quiz.
Once student enters the Quiz,
-
- They are not allowed to access the learning content.
- They can try to answer again if they get it wrong for the first time.
Once they finish the Quiz,
-
- They can “Review” the Quiz answers by using the navigation keys.
- They can “Exit” by clicking “X”.


